I think I've mentioned this before in the master's section of this website/portfolio the confirmative praxis is a much more developed explorative praxis. I believe that I've developed the methodology I came up with and the work for the confirmative does demonstrate that it can produce products/objects that are alternative yet still within the constraints which they set out to be within. Meaning, that when the development stage of each section began (after refining the words down to 6 - 10) I didn't necessarily know what product or item it was going to be. But, after contemplating concepts within sketches and notes I restricted myself to one idea so that I can focus on making it fit within what is characterized for that so-called idea to become that so-called product. Therefore although I've experimented with this notion with the three completed sections (not including the introduction), I haven't gone off the rails with the designs since I want them to be identified for what they are. Hence they look like the products they are meant to be.
Compared to the explorative the outcome of the confirmative is less in actual finished work. The explorative had 9 and the confirmative had 3. Yet the outcomes are more refined and at a higher standard. This means that I took my time with making sure that each section was completed to a satisfactory level and each had a significant amount of development work to explain how the product came about. Which wasn't present in the explorative. Therefore the overall work produced (development and finished) including the research, essays, sketches and conceptualising is denser than the explorative. This is because I realised I needed to make sure that it was understandable and not chaotic. The explorative was a mess in terms of organisation because I had given myself too much work from the start. The confirmation was a gradual progression of completion. This means there was no race against time since there wasn't any word sections made straight away. Having one section only to work on created less pressure and produced more considered choices which weren't rashly.
Although I've stated that I believe the methodology does work, I can't prove it may work for someone else. I did plan on having other people from different pathways (illustration, Fine art, etc) try out the method but this didn't happen due to the time requirement needed for it. I had made a guide for them to use which gave an example of how to use the guide and what I would like them to do. Since none of them was able to commit to the task I decide to turn the guide into a booklet that would provide information on the methodology as well as show the stages of development of the confirmative praxis. This booklet is on the exhibition page. The project was a success since I was able to achieve what I set out to do and the models and portfolio of work prove this.
Although I've stated that I believe the methodology does work, I can't prove it may work for someone else. I did plan on having other people from different pathways (illustration, Fine art, etc) try out the method but this didn't happen due to the time requirement needed for it. I had made a guide for them to use which gave an example of how to use the guide and what I would like them to do. Since none of them was able to commit to the task I decide to turn the guide into a booklet that would provide information on the methodology as well as show the stages of development of the confirmative praxis. This booklet is on the exhibition page. The project was a success since I was able to achieve what I set out to do and the models and portfolio of work prove this.
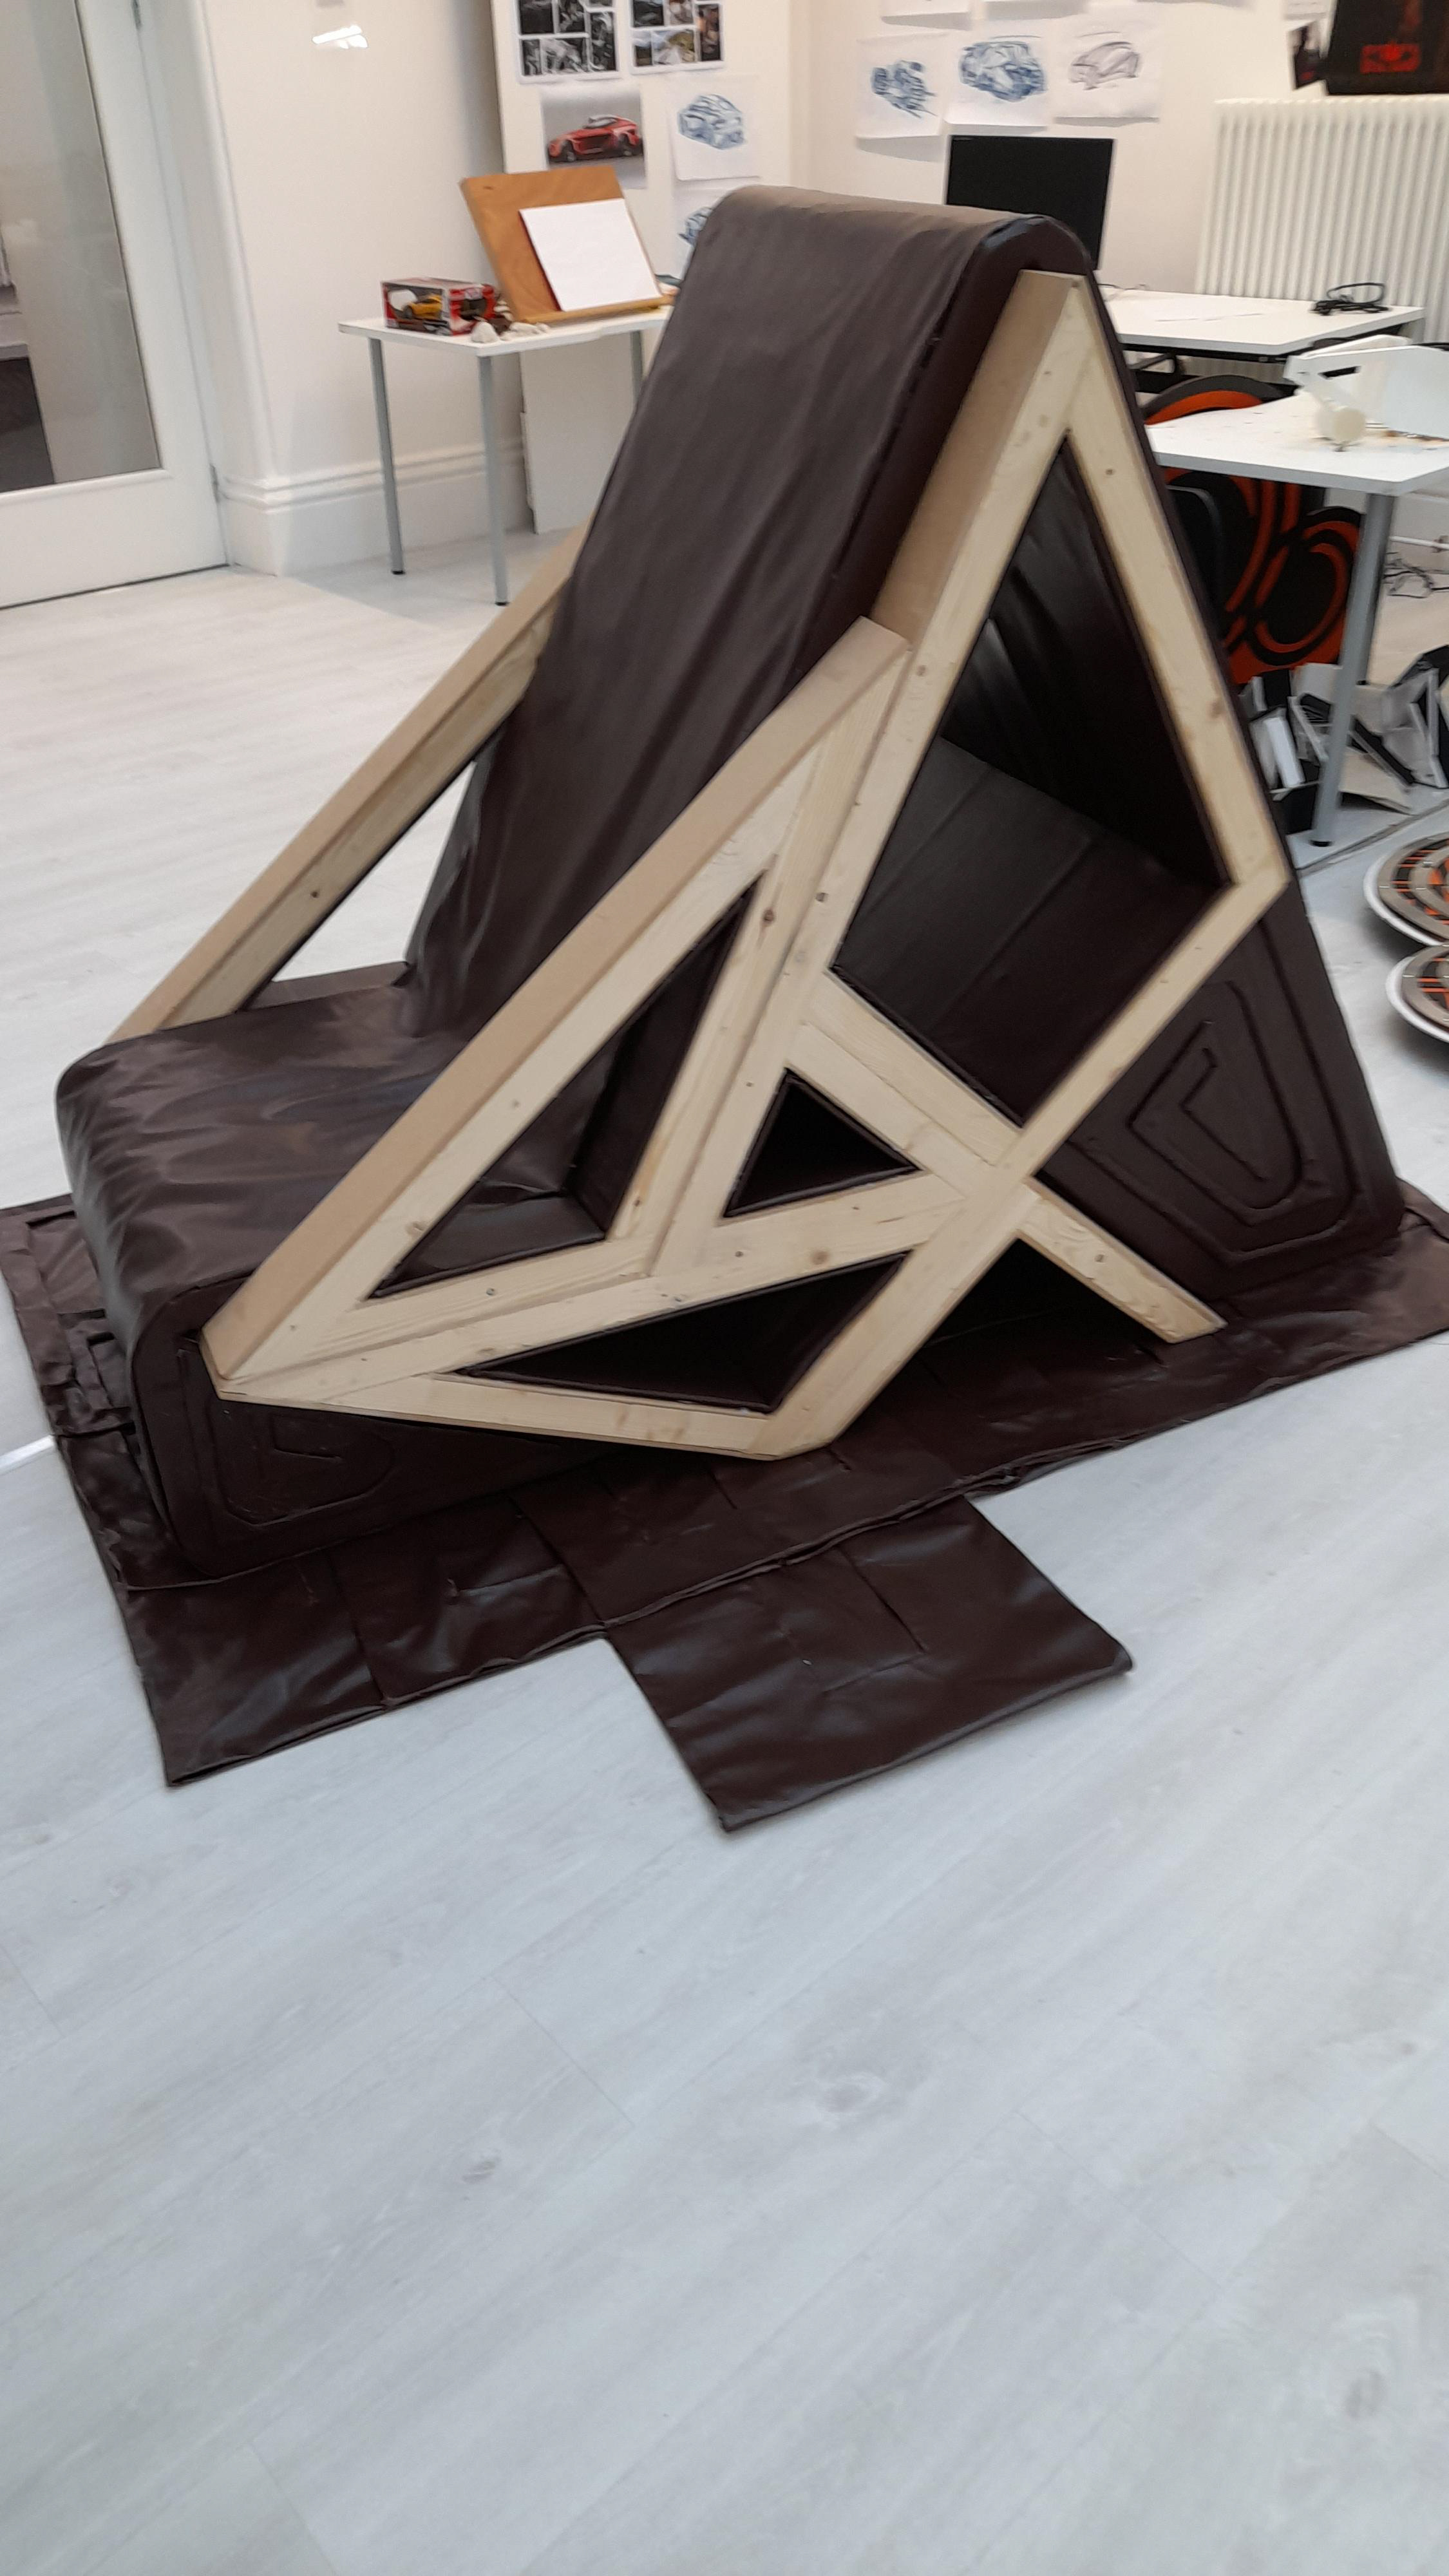
But still, some of the choices were made solely on what I had available as well as what I could afford. For example, the fabric on the G.A Chair is not great. It doesn't make the chair uncomfortable and is similar in colour to the cad design but its appearance isn't of high quality. Since there needed to be a significant amount due to the size of the chair I didn't want to waste money on a fabric that was more expensive with the chance of a mistake happing. The Spiral sides could have been reconsidered since the application of adding them wasn't considered enough. I glued them on since I wanted the spirals to be noticeable by being slightly raised. The blanket/rug is not to scale but has been made to a size to match the chair. So it doesn't have the type of effect I planned for it. Sewing all the pieces together was difficult so I did resort to glueing that as well which was as difficult. Whereas if I were to do it again I wouldn't have it layered but I would just have one piece of fabric with the pattern printed on it.
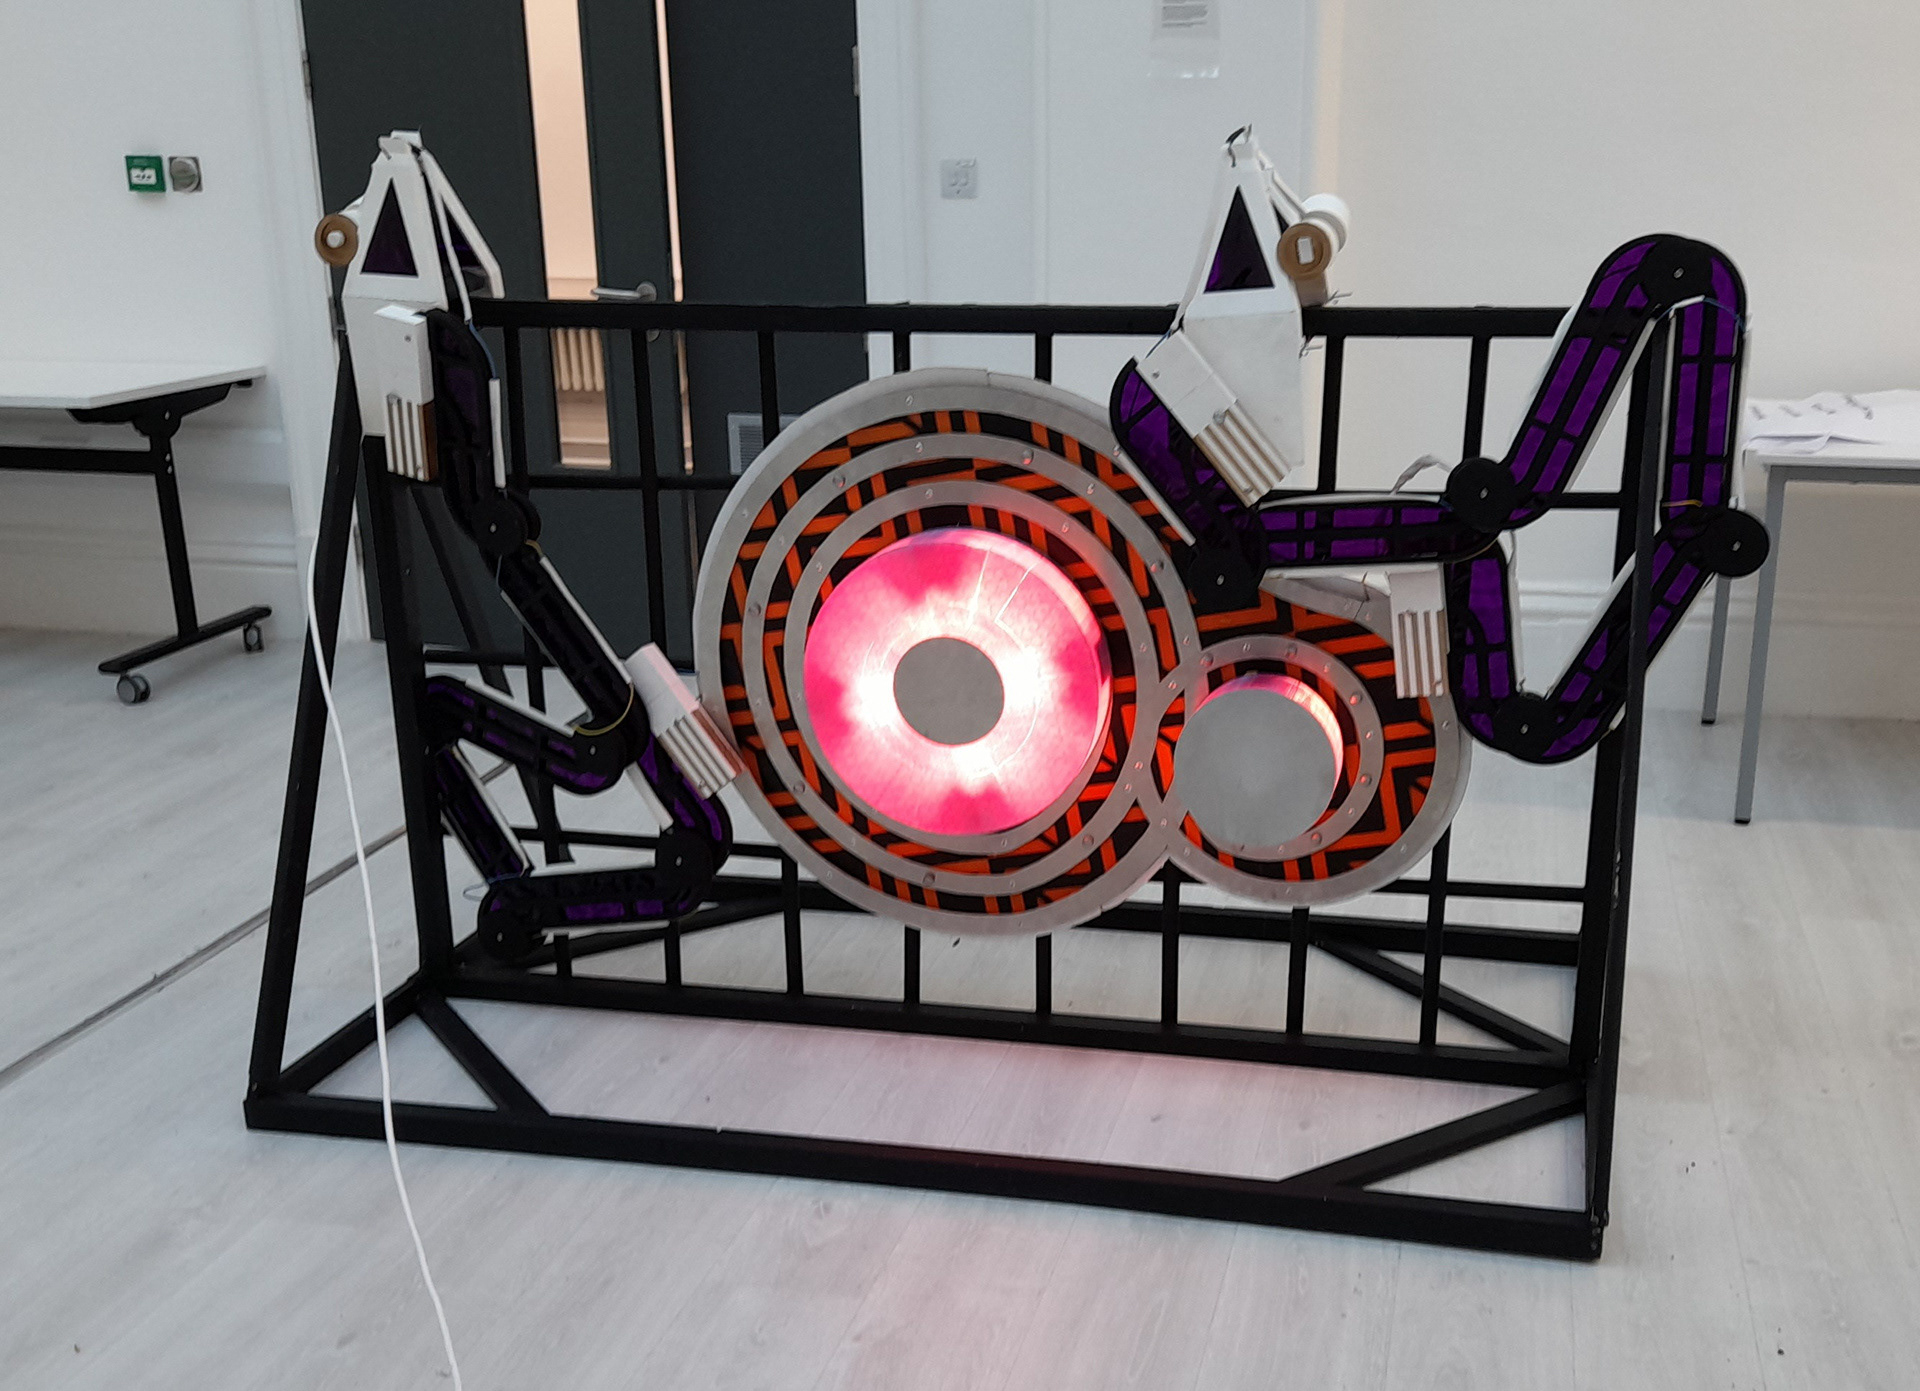
The complexity of the amphis whorl light was an issue since it took longer to complete because of this. I did manage in the end to make it less complicated but there is still room for improvements and other considerations. First, the actual bulb holders aren't noticeable with the shade covering them. I originally thought that the shade would be transparent enough to see the bulb holders since they took a significant amount of time to 3d print. Some of the cables are visible which isn't a massive issue but it wasn't what I intended. The adjustable arms function is great but getting them to stay in place takes a while since you have to tighten every individual nut. The snake-like grips are a bit basic but the idea is shown through them which I intended. The frame isn't that bad but I cut that by hand whereas if I machined it instead it would have a more polished (professional) looK to it.
The complexity of the amphis whorl light was an issue since it took longer to complete because of this. I did manage in the end to make it less complicated but there is still room for improvements and other considerations. First, the actual bulb holders aren't noticeable with the shade covering them. I originally thought that the shade would be transparent enough to see the bulb holders since they took a significant amount of time to 3d print. Some of the cables are visible which isn't a massive issue but it wasn't what I intended. The adjustable arms function is great but getting them to stay in place takes a while since you have to tighten every individual nut. The snake-like grips are a bit basic but the idea is shown through them which I intended. The frame isn't that bad but I cut that by hand whereas if I machined it instead it would have a more polished (professional) looK to it.
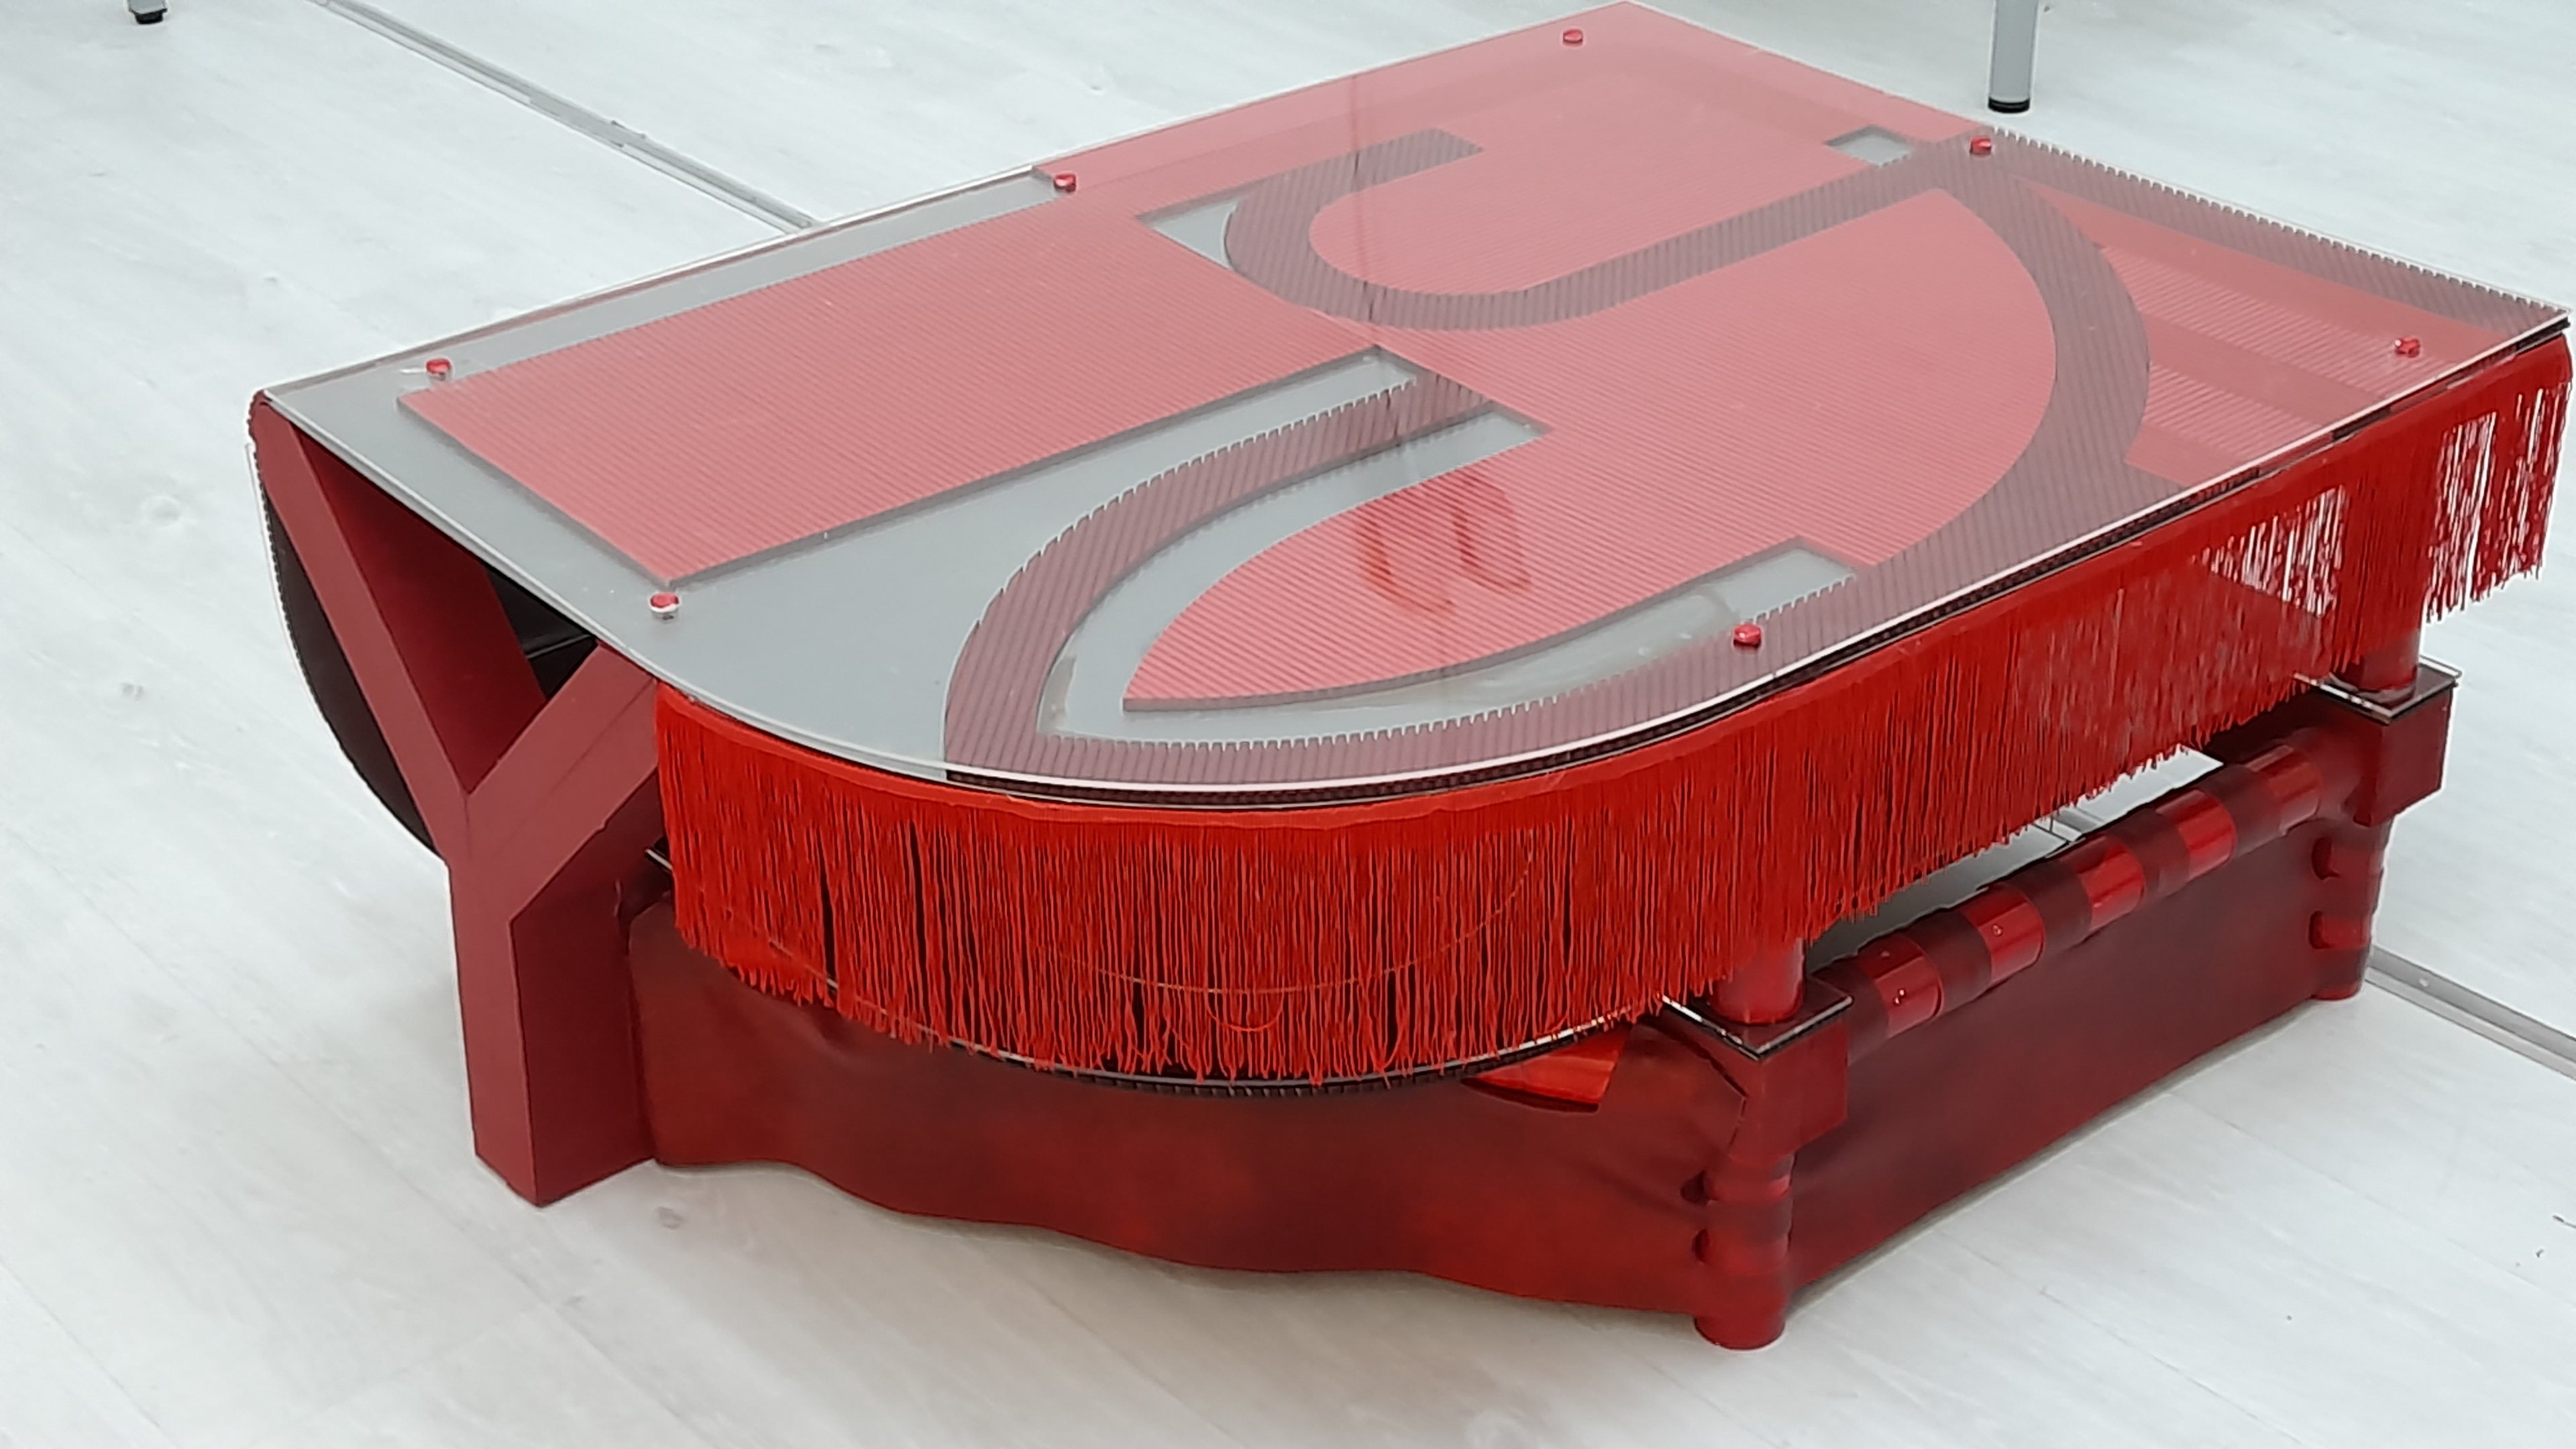
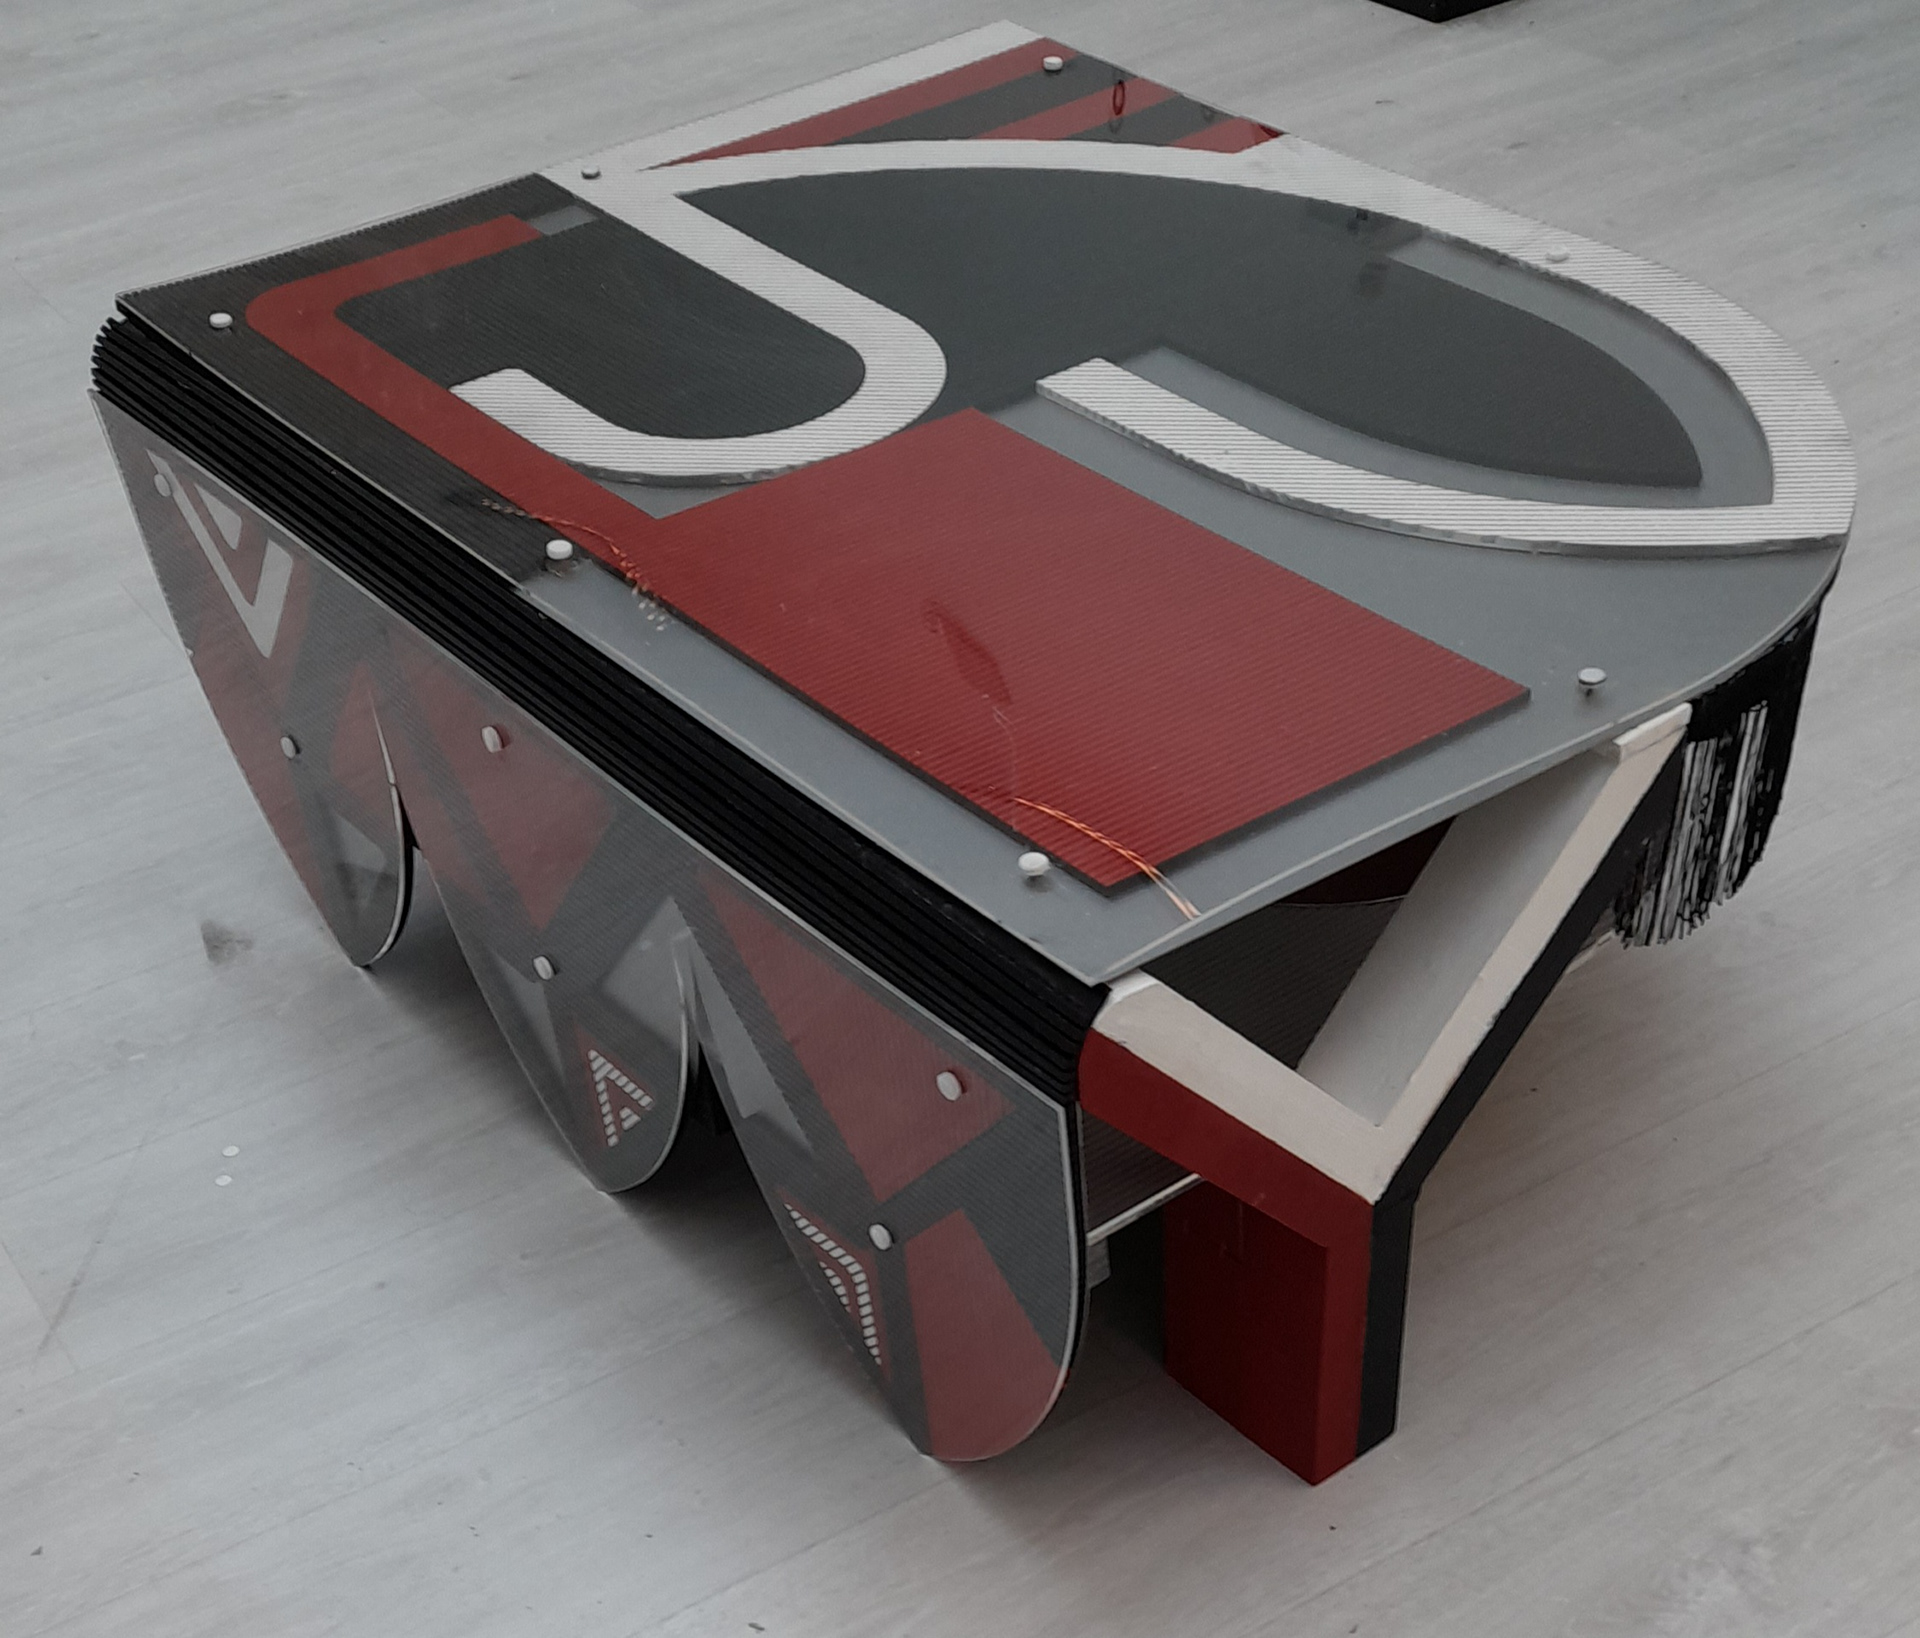
The coffee tables didn't take long to assemble. However, I had the material laser cut not in the uni but by an outside company. When I had asked them to make sure all parts to be laser cut was facing upwards (as I had indicated on the material when I had sent it to them) they didn't for some. This caused issues with the internal frames which had to be taken apart and resembled. I didn't have time to buy new and make it as it once was so some of the pieces are crude. Although since the coffee tables are lows it's not as noticeable as I first thought. The acrylic that was laser cut did crack easily which sucks but as stated I couldn't order a new piece in time. so I just went with it. The overall effect of the stripe going in different directions works well but the timber is visible and could have been replaced or coved with veneer since it does in some areas look a bit rough.
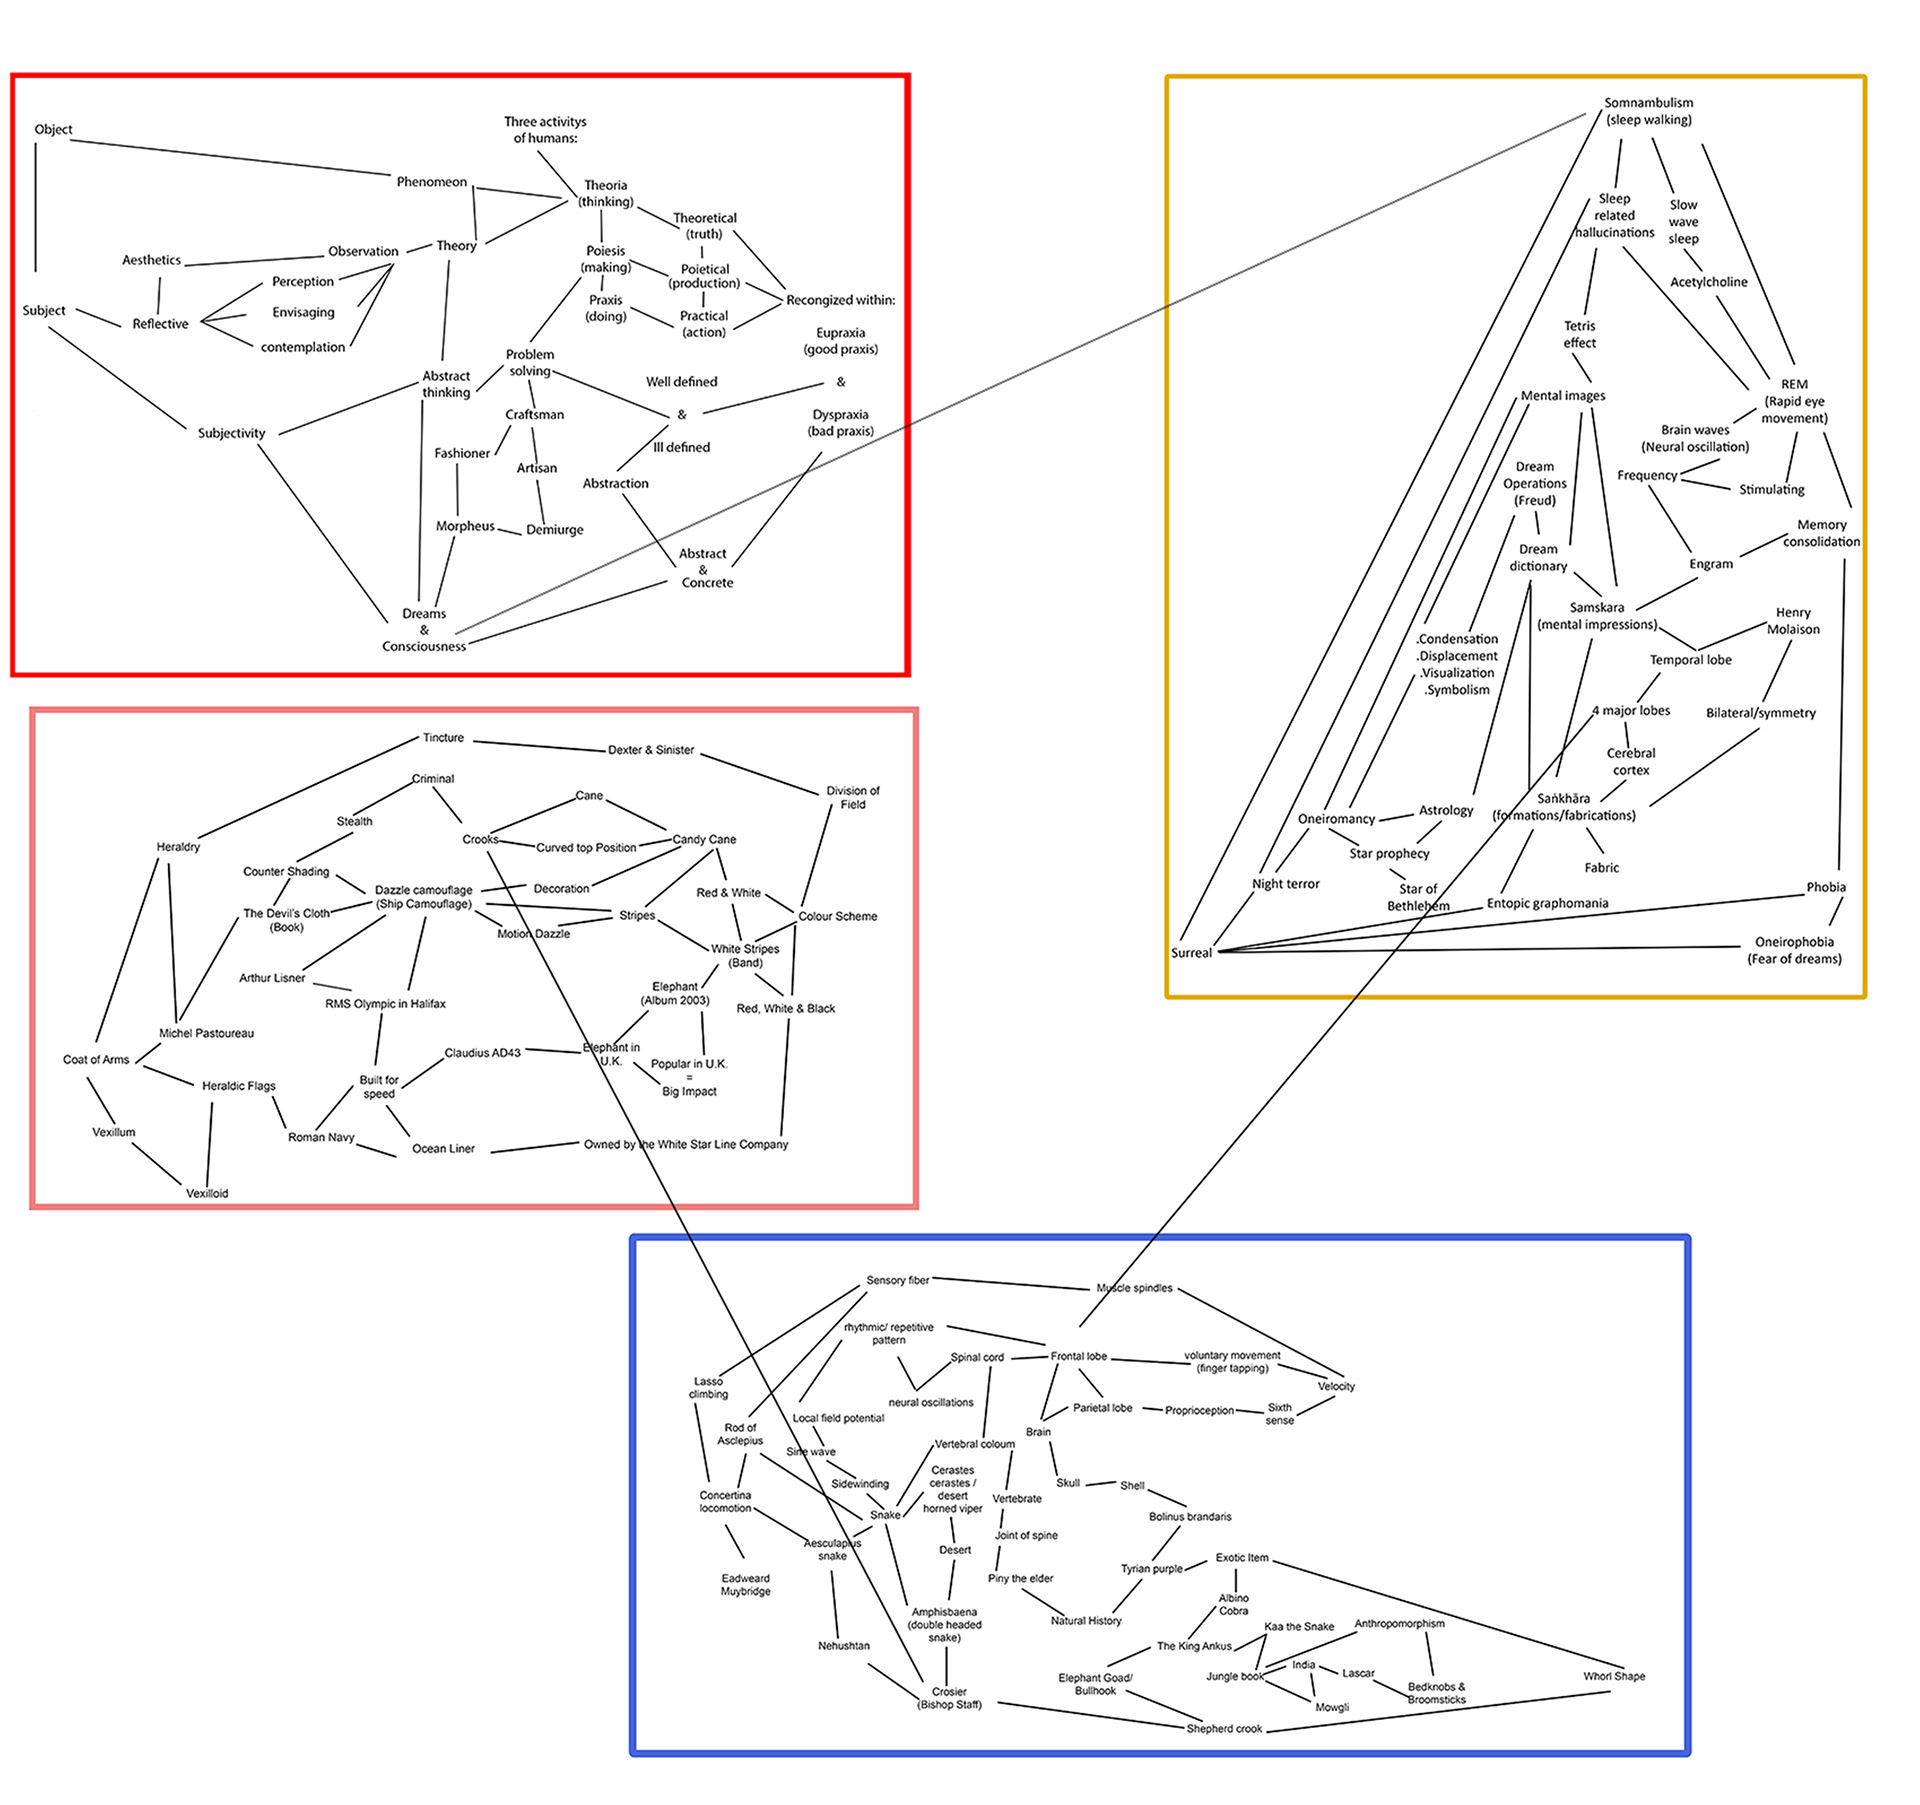
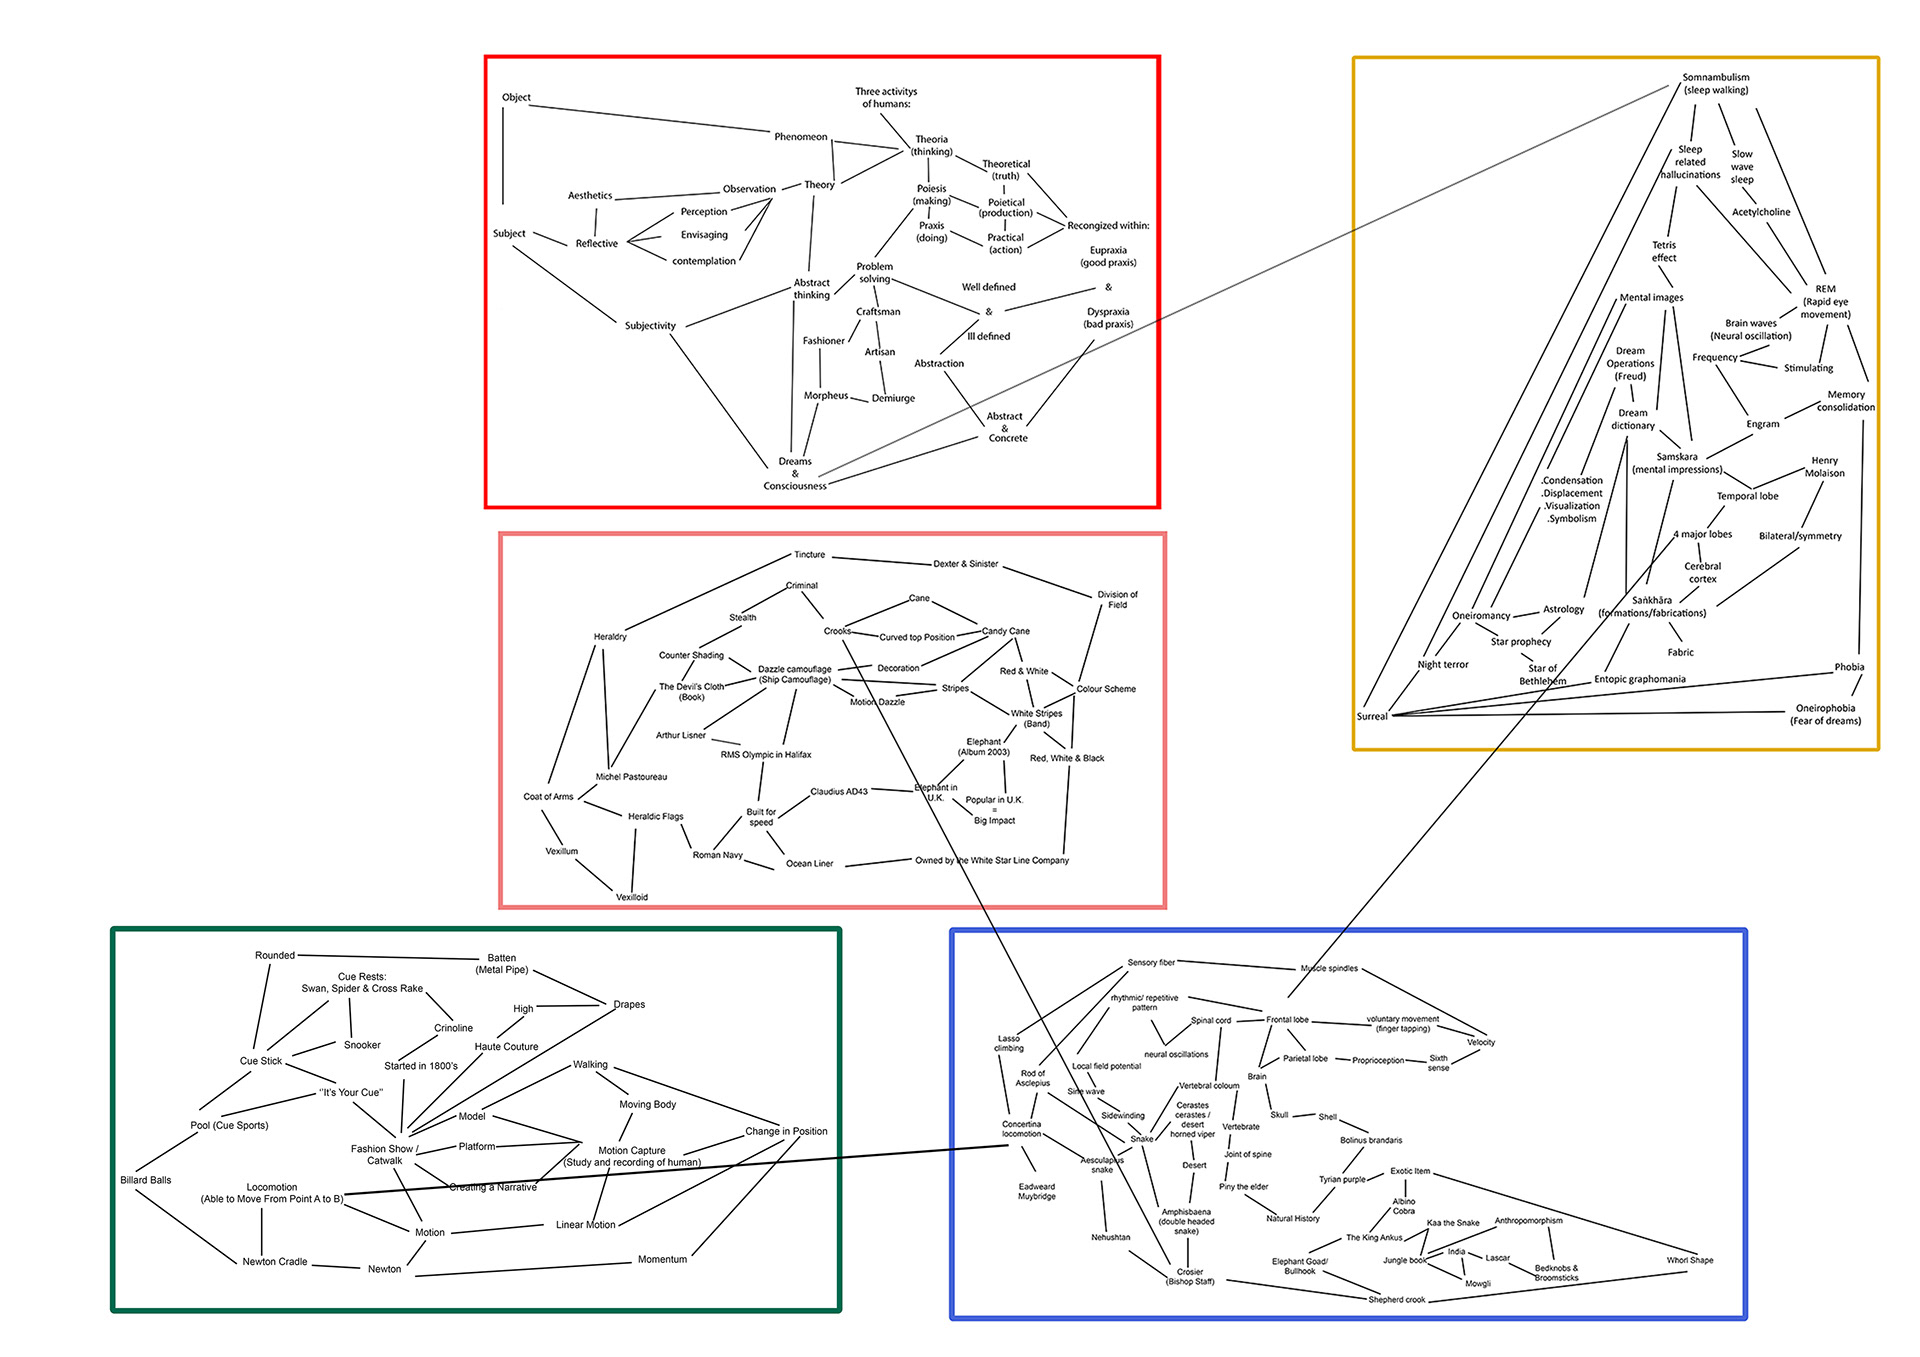
original map
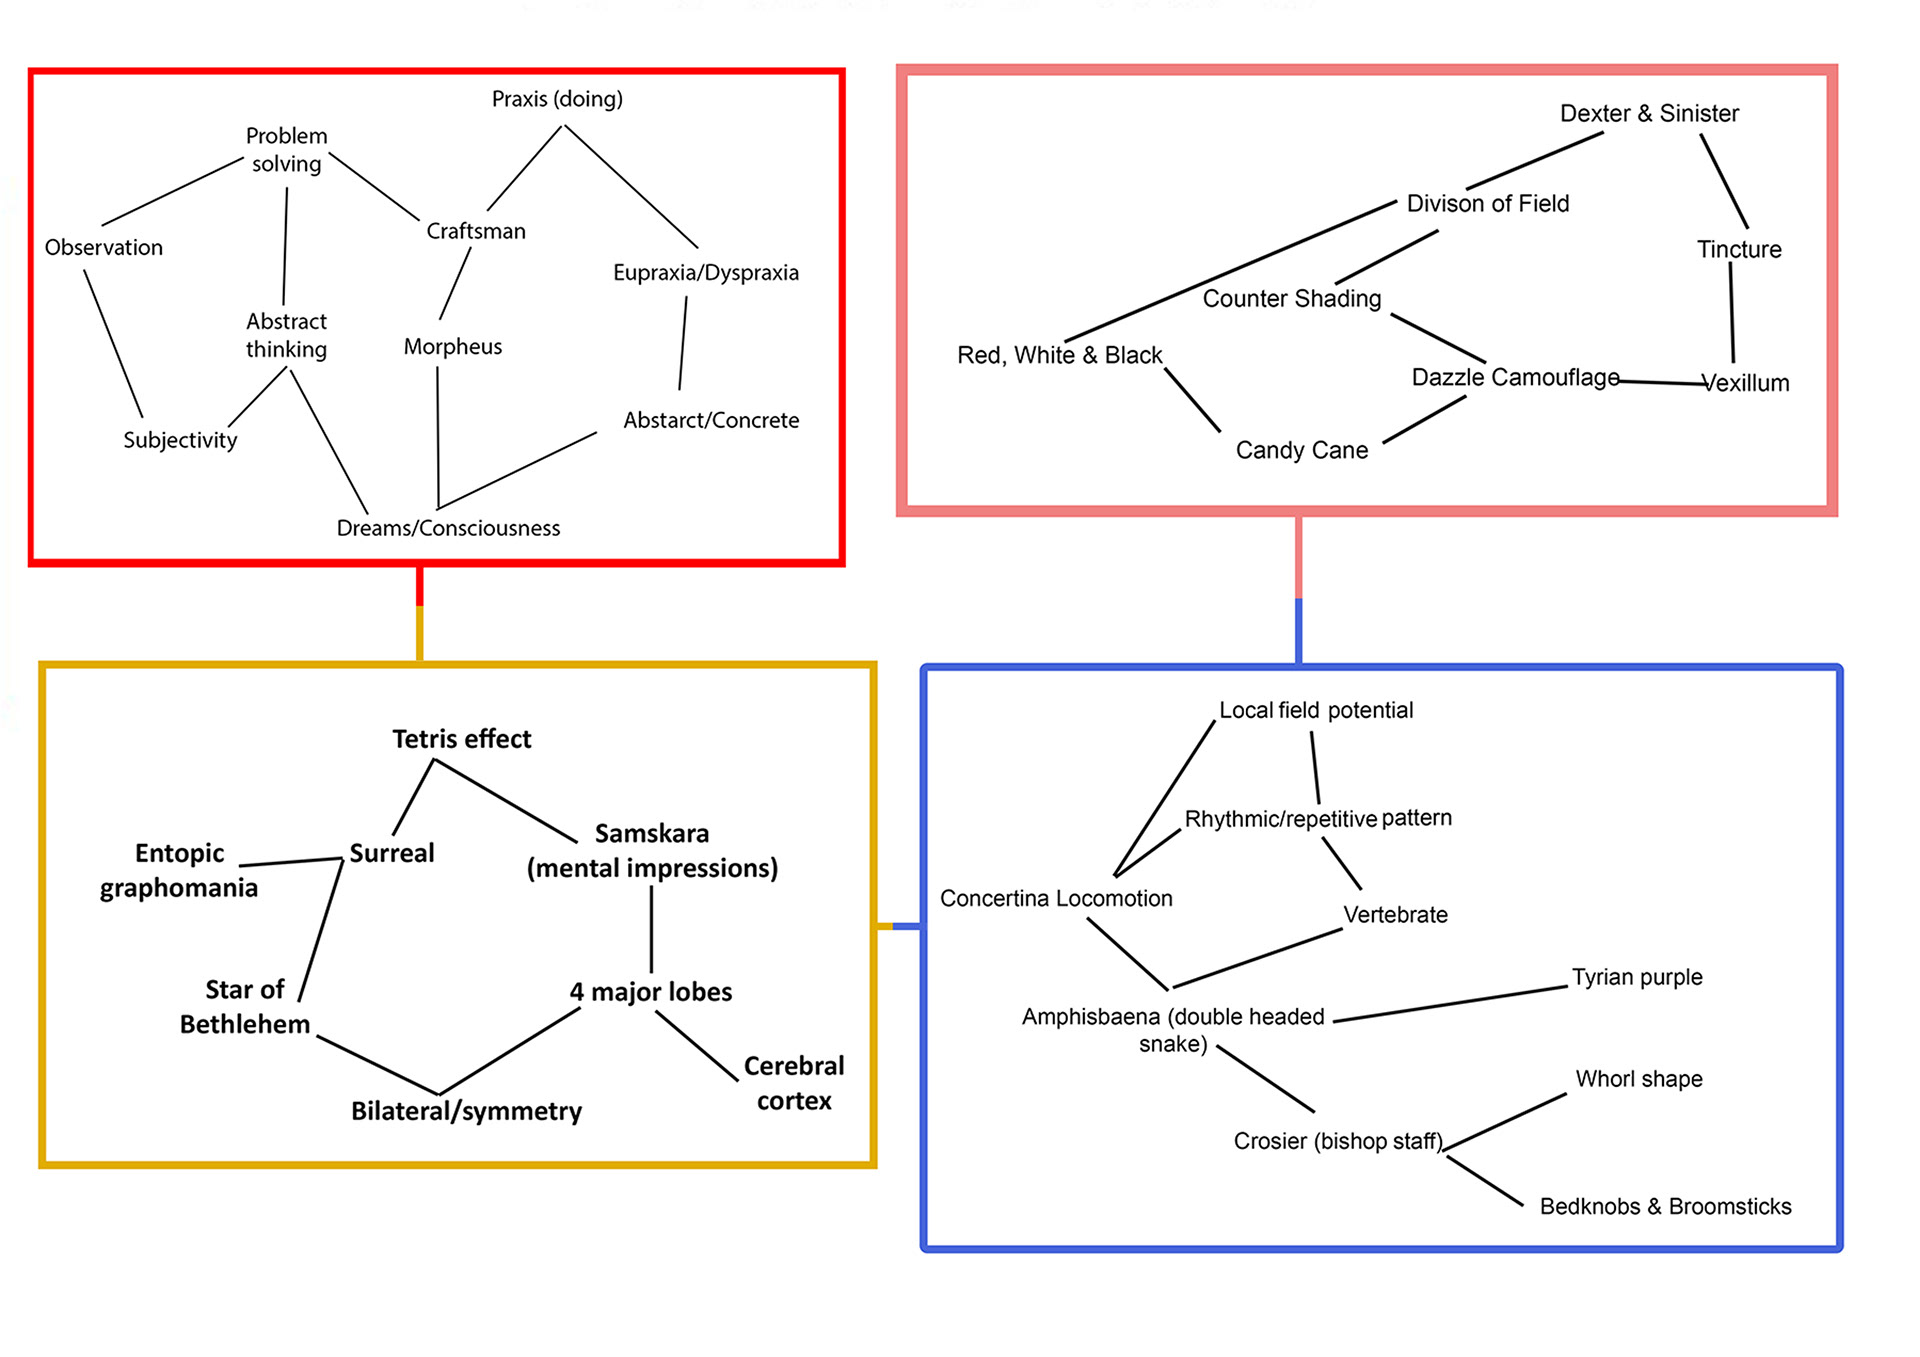
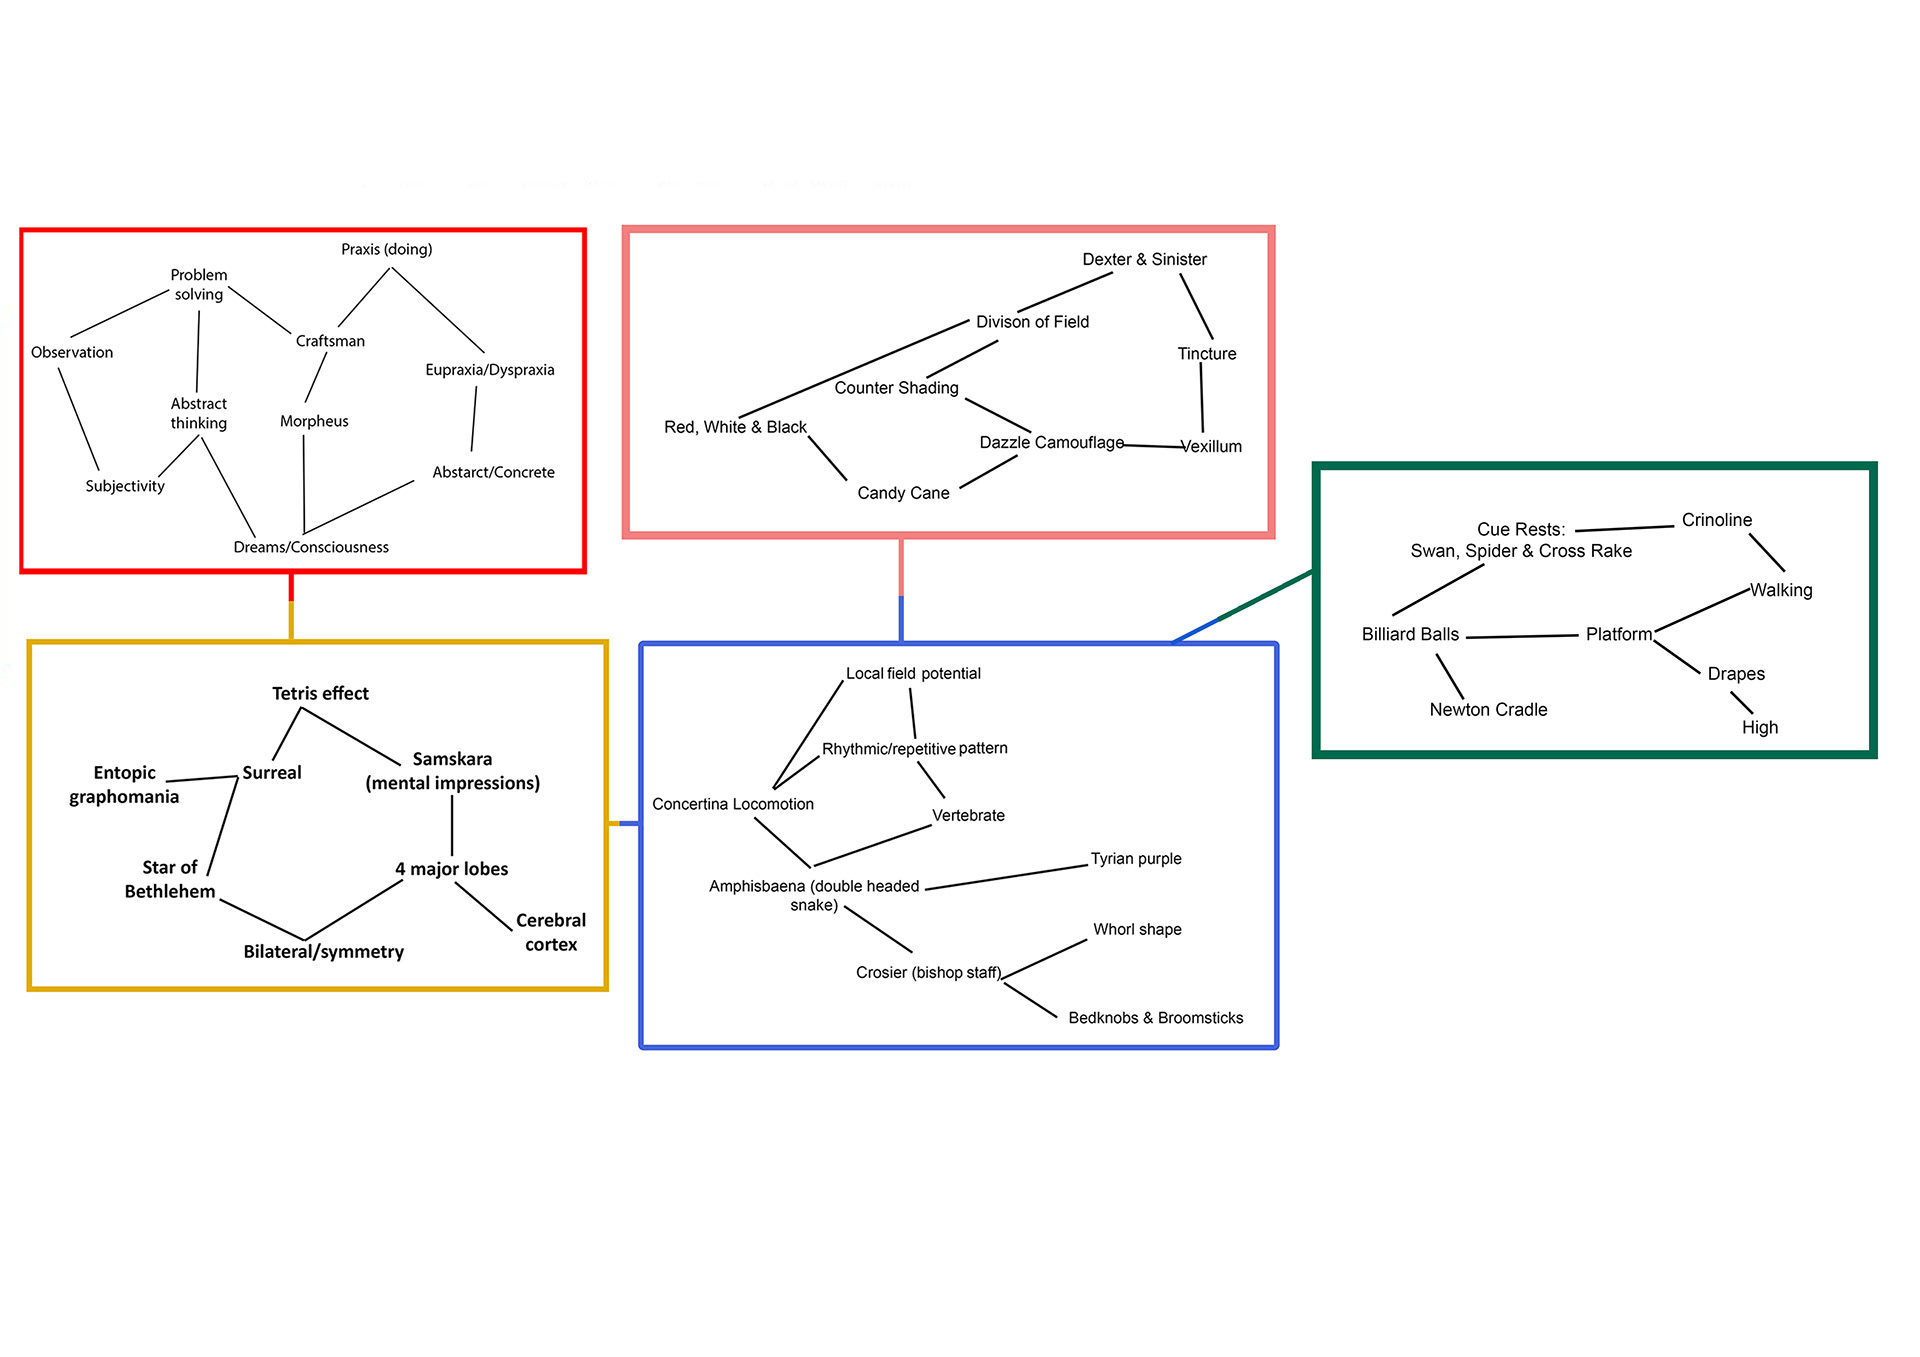
refined map
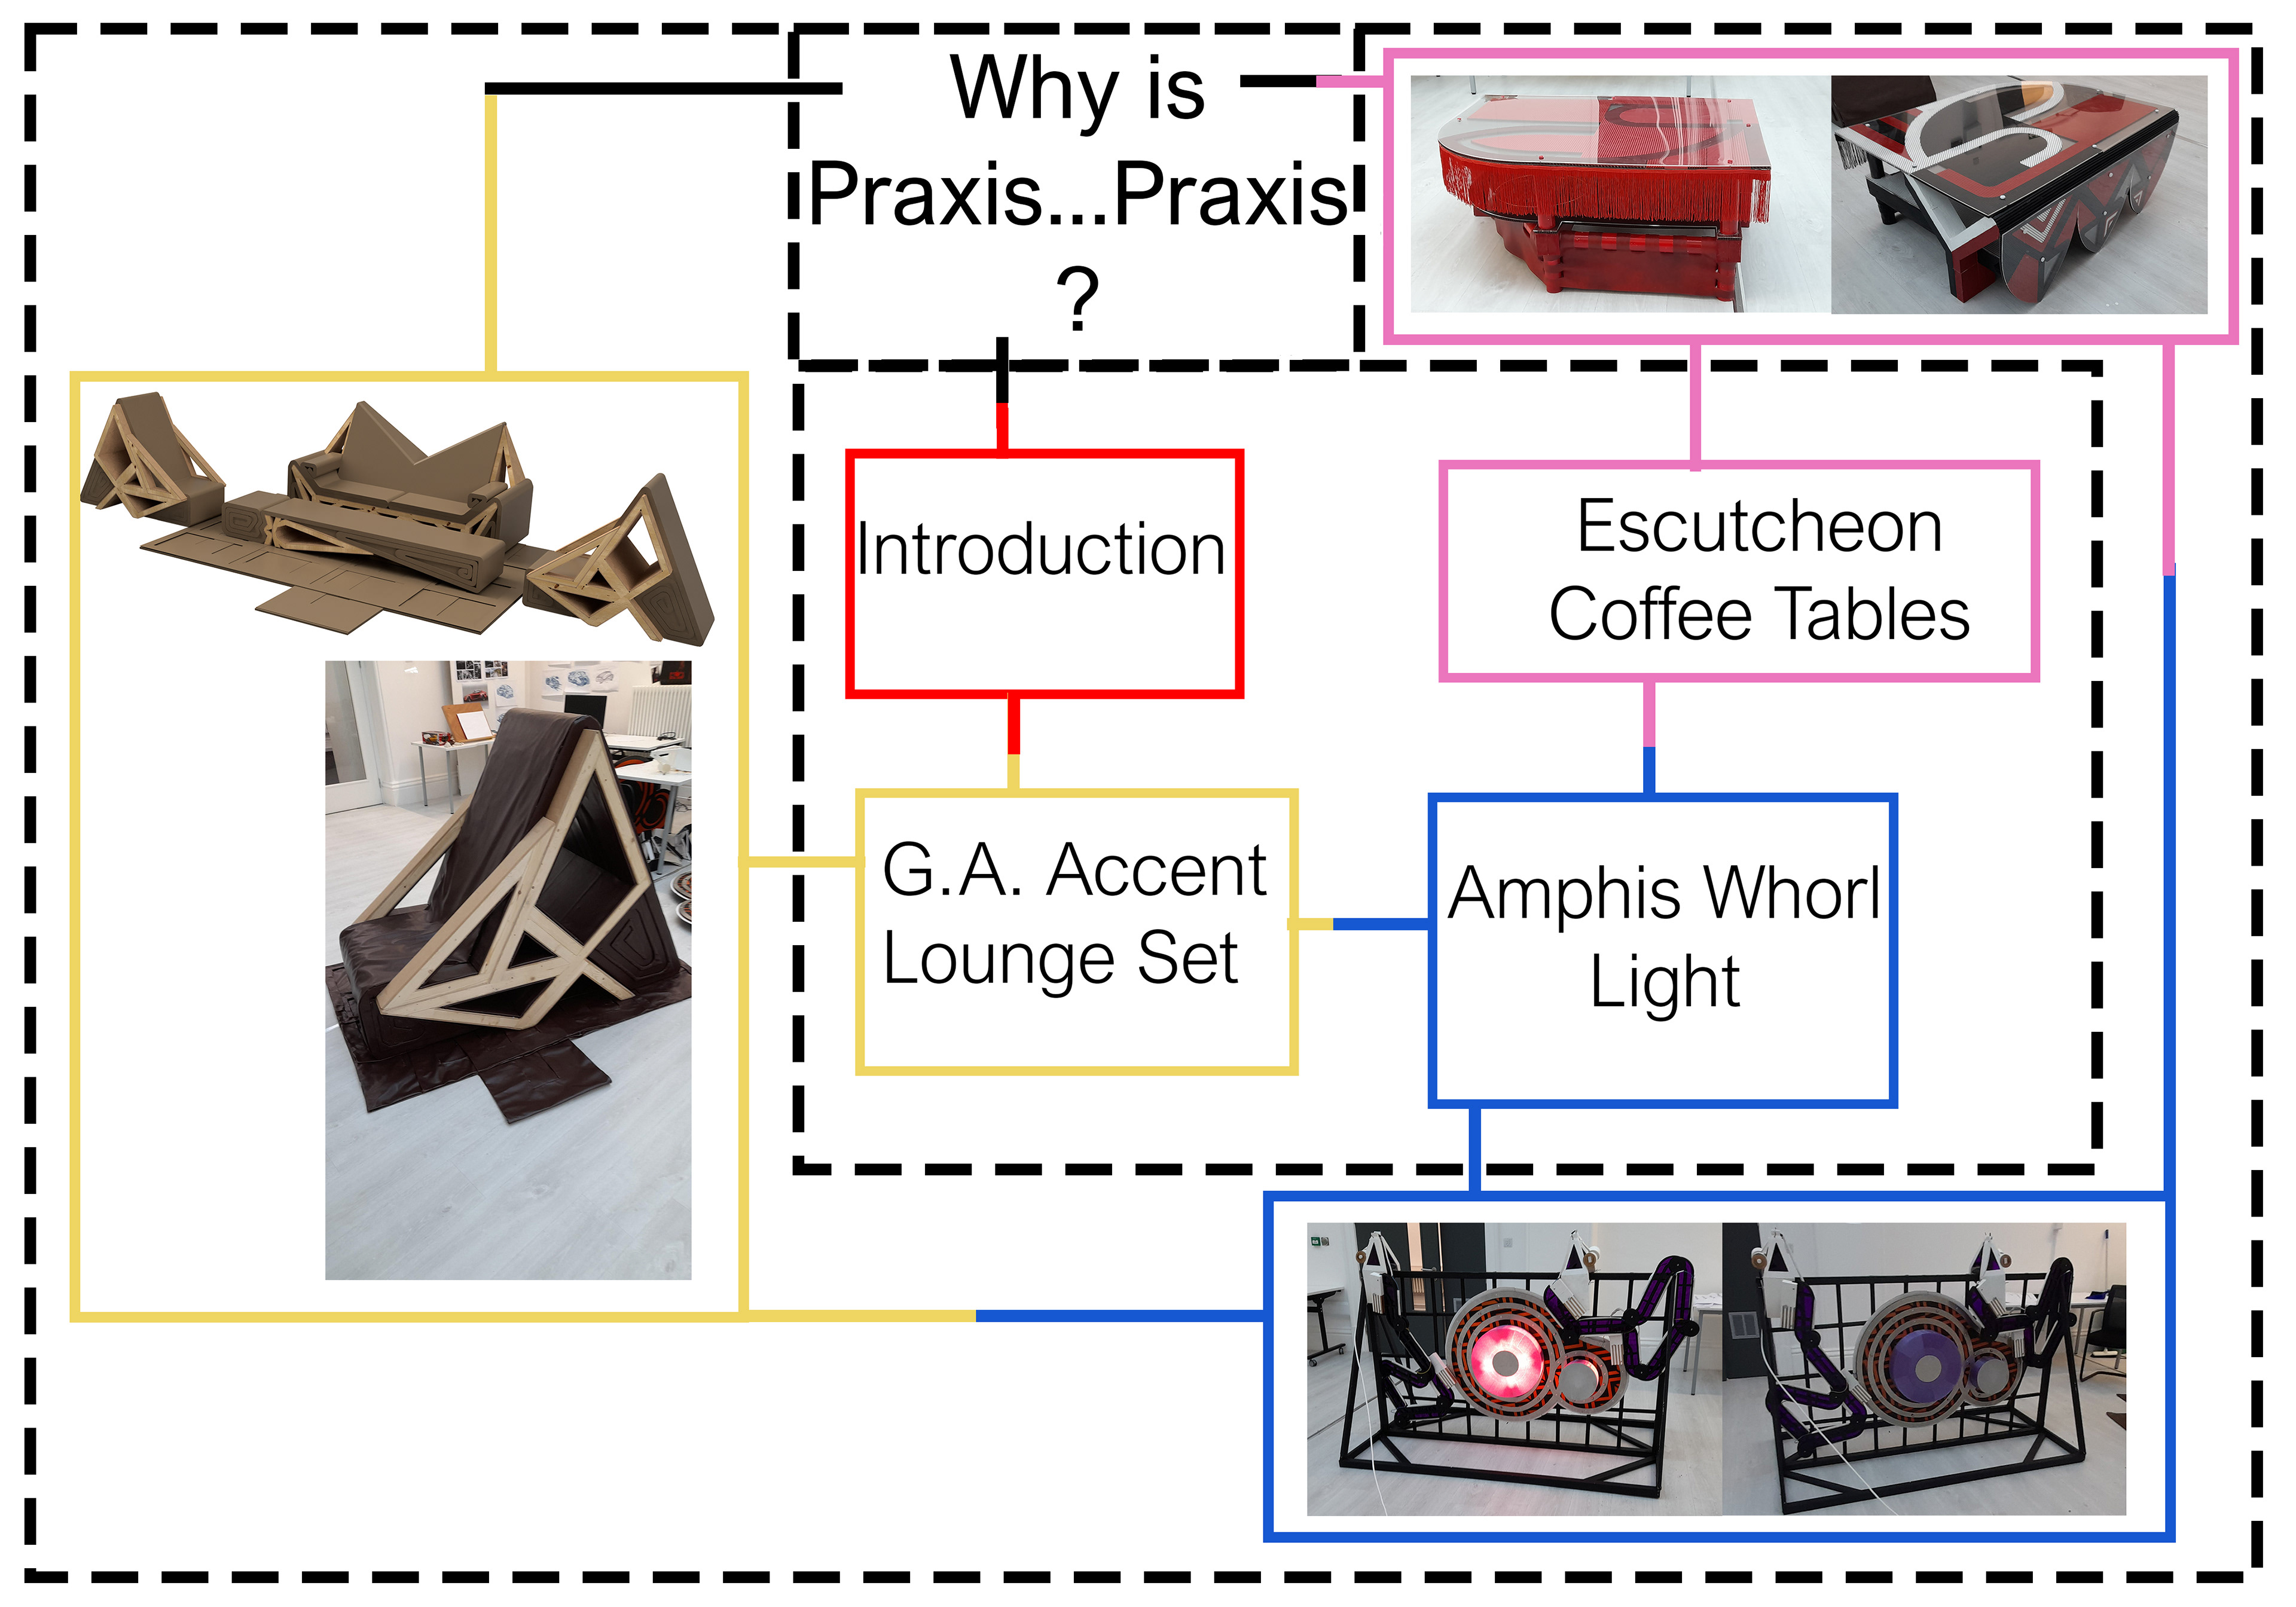
concluding map
What's next and other info
The purpose of the confirmative was to develop and prove that the methodology is practical. I do think I've achieved this. I'm not going to be taken any of these completed sections further unless something changes my mind. That being said I could continue with the word praxis and add more sections in my own time.
The maps show how it was from one section to the next, however, you could actually do two sections from the same previous section. Shown below
The maps show how it was from one section to the next, however, you could actually do two sections from the same previous section. Shown below
This is just for show. Basically what it means is that the order of the sections doesn't need to be as direct as I've done it. you can have more than one section connected to a previous section. Another point I would like to make clear is that I didn't set out to complete three sections. I just went with and did as much as I could. therefore if this method was to be used then there would be different outcomes depending on what the brief states. For example, if the brief stated that it wants a mirror then you would only need to do one section unless you have more than one idea. Another example could be that the brief/task wants a dining room table and chairs design. Therefore you could have a section for the chairs and the table or you could have one section that covers both. what I mean by all this is that the methodology doesn't need to be used exactly as I have. but rather be used as more like a guide.